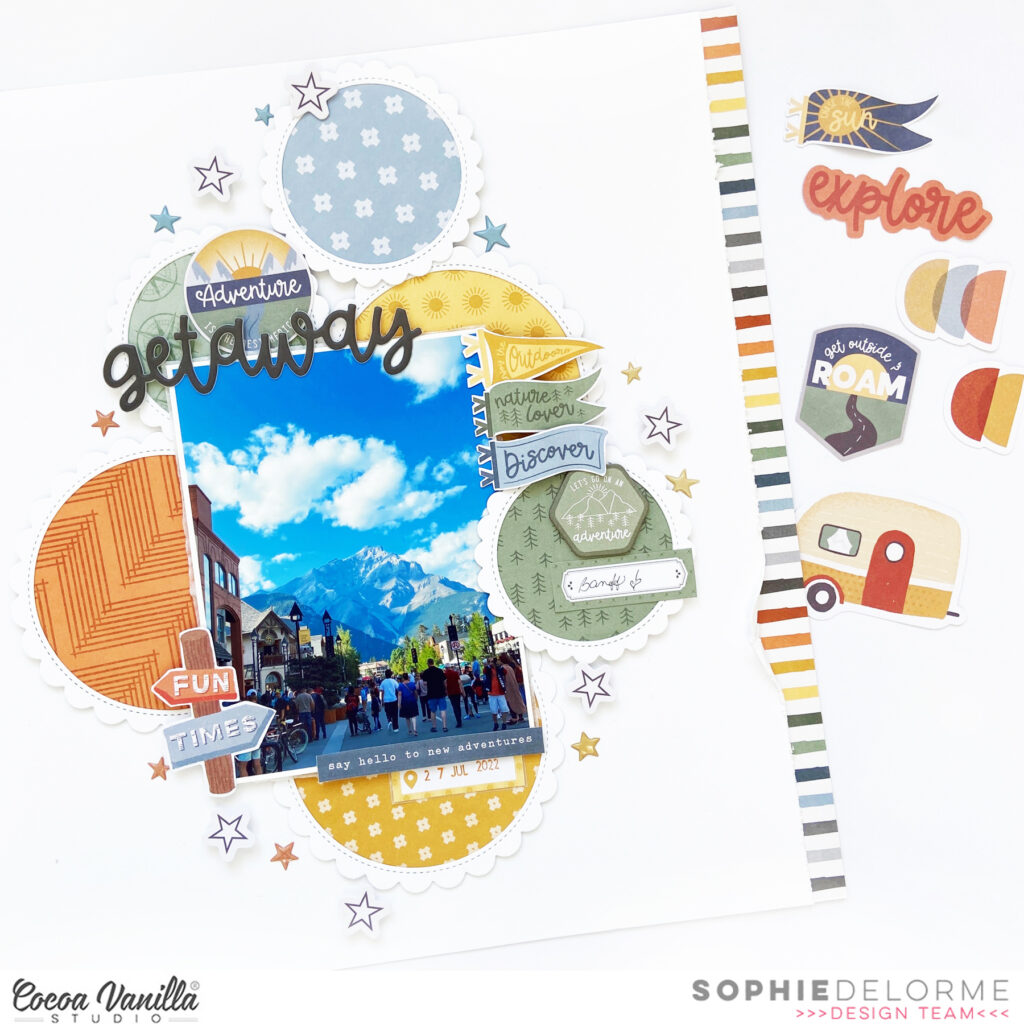
It’s Sophie with you today and I am happy to share this new layout created with the Great Escape collection !
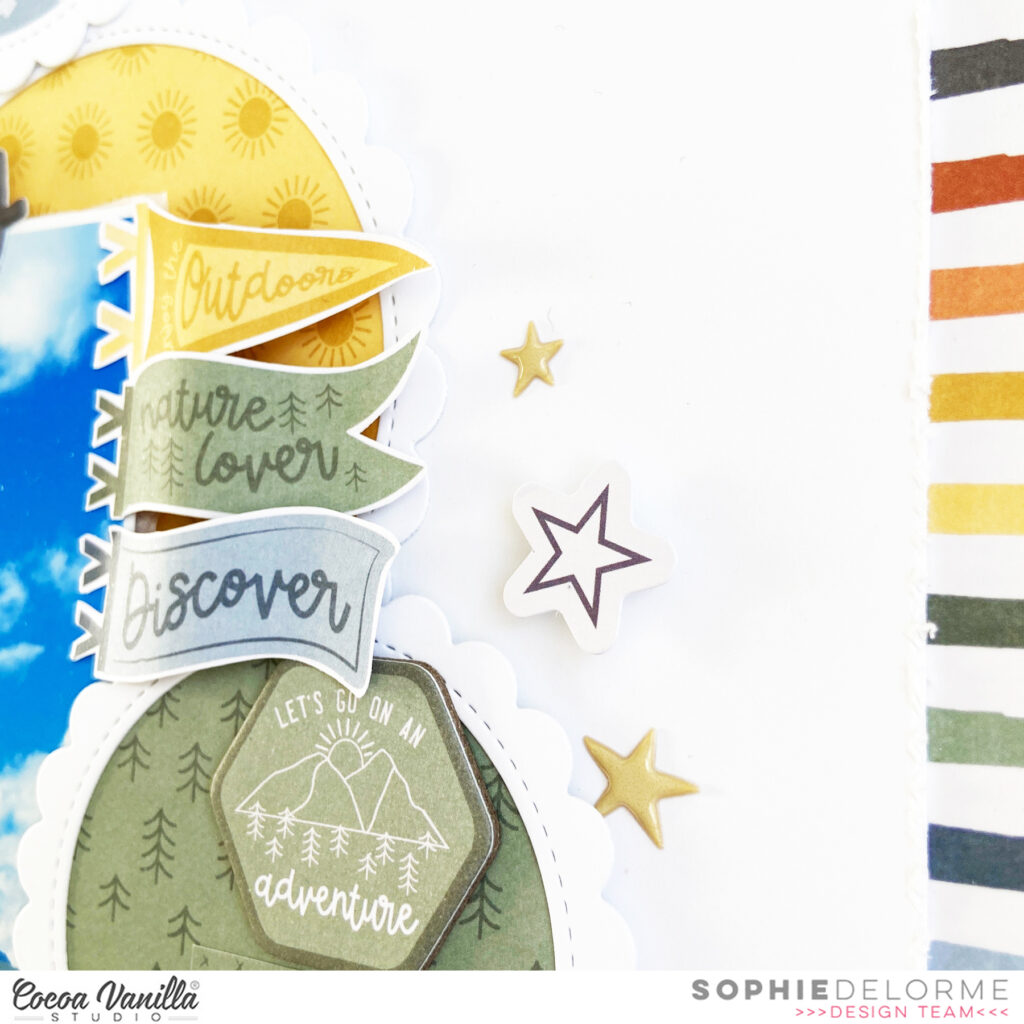
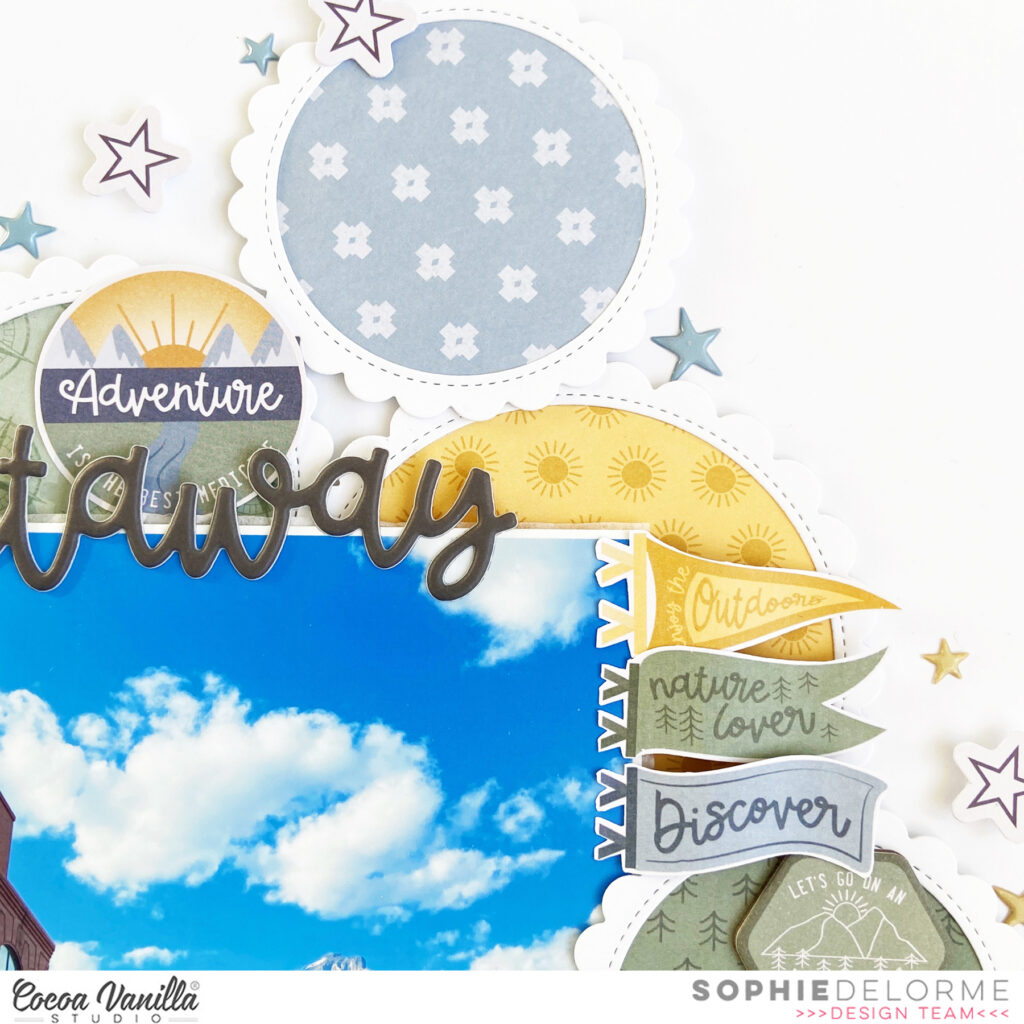
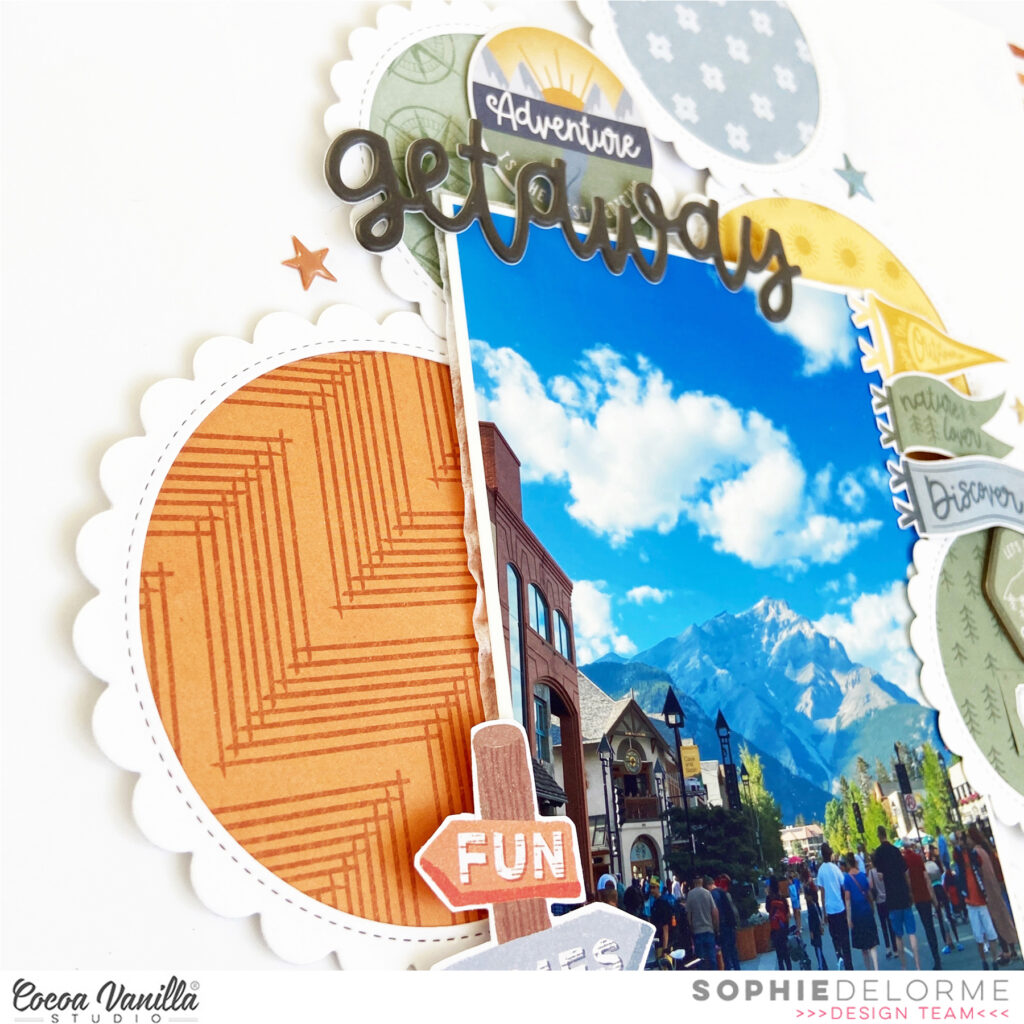
I went with circles for my design and selected several different patterned papers from the collection and placed them in scalloped circles (created with a metal die from my stash).
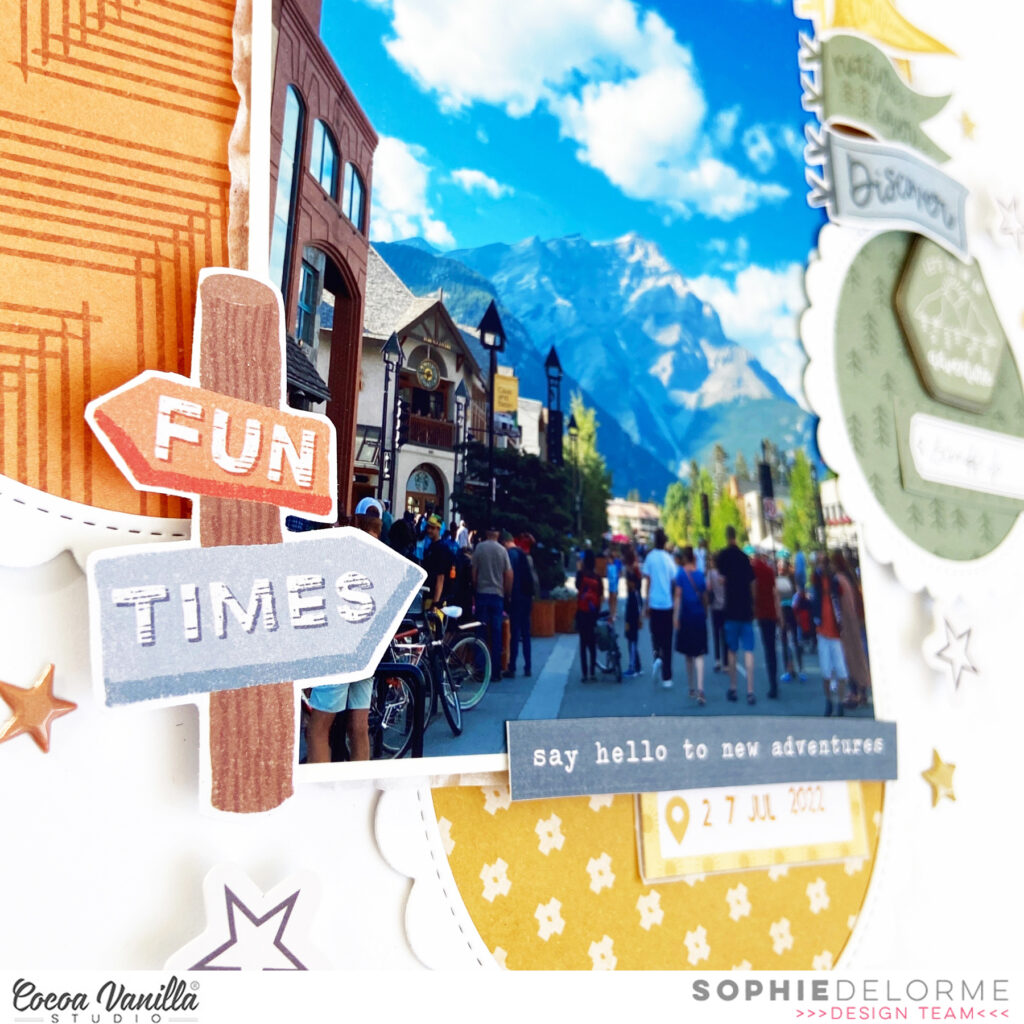
I selected a beautiful photo from our trip to the Rocky Mountains and centered it on my page.
I embellished around the photo with all these coloured circles.
I cut about half an inch for both sides of my 12×12 white cardstock and placed it on the beautiful striped paper “Journey” from the collection. It recalls all the colours from the circles and ties everything together !
Finally, I embellished the layout with Die cuts from the Die Cut Ephemera pack, stars from the Puffy Stickers pack and used a Foam Title Sticker for my title.
Here are more close-ups:
It’s different and fun ! I love how it turned out !
I hope it can give you inspiration to get crafty !
Thank you for stopping by, I will see you again soon !
Hello crafty Friends! It’s Anna here with my layout inspired with MAY CHALLENGE. The topic for this month is FLOWER FRENZY and I think I did it a justice.
I made a page filled with flowers and almost nothing else. Go bold or go home right? It was such an easy job with Floral Ephemera products and almost each Cocoa Vanilla collection has them!
I actually combined two of my favourite things – flowers and rainbows. I just arranged the flowers in particular order creating horizontal stripes of color. As you can see, this background required a lot of flowers so I combined Floral Ephemera packs from both HAPPY DAYS and SUNKISSED collections. They both share similar, juicy color palette so flowers match together perfectly.
I started with shite cardstock and just added flowers in two layers. Some of them are glued down directly to the background and some with one layer of foam. Next step was to add extra leaves and flower buds. I didn’t have enough of single leaves to I just cut branches into smaller pieces.
After the background was done, I added my photo and title created with Chipboard Title Srickers. Each letter is a separate sticker so you can also treat those words as a source of letters and create new words with them.
I finished my project by adding tiny Puffy Stickers in a shape of hearts and few words from 6*12 Accessory Stickers. Flowers did the whole work here so I didn’t need much of an embellishing.
How do you like my idea for a custom made background? it will be a perfect idea to use up the leftovers from older collections too. You can also fussy cut flowers from 12*12 papers. Almost each CVS collection has one, that is perfect for this purpose!
That is all for today! Thank you so much for spending your time with me and see you in two weeks!
Hey everyone, this is Niki (@nikiclairecreates) here with my latest layout and process video using the Great Escape Collection. For this layout I decided to feature the wonderful journaling cards from the cut -apart sheet. I chose four cards and arranged them in a grid design together with two photos. I mounted the two photos onto some of the papers from the A5 Paper Stack.
I made the journaling cards and the mounted photos all the same size and distressed the edges of all. I arranged them onto my white card background and then I started to add some fabulous embellishments – my favourite part!
I used Floral Ephemera from the Heart & Home collection as the base for each of my clusters. I tucked them under some of the cards in three distinct areas. I added Great Escape Ephemera to the clusters, mostly smaller items, including stars, banners and arrows.
For my title I used the Wild by Nature title from the Puffy Title Stickers which I added to one of the journaling cards. I love these titles, there are so many totally awesome options! I added some Ephemera words: ‘explore’, ‘roam’ and ‘adventure’ to my layout too and added word strips from the Accessory Stickers. I finished off with my journaling and splatters of black paint!
Thanks so much for joining me today and happy scrapping
Welcome to the scrapbook blog of Cocoa Vanilla Studio. It’s great to see you here looking for some new scrapbook inspiration. It’s May, and this month it’s all about flowers. Have you seen the new challenge yet, the Flower Frenzy Challenge? For this challenge, we invite you to use flowers as the main design element of your layout.
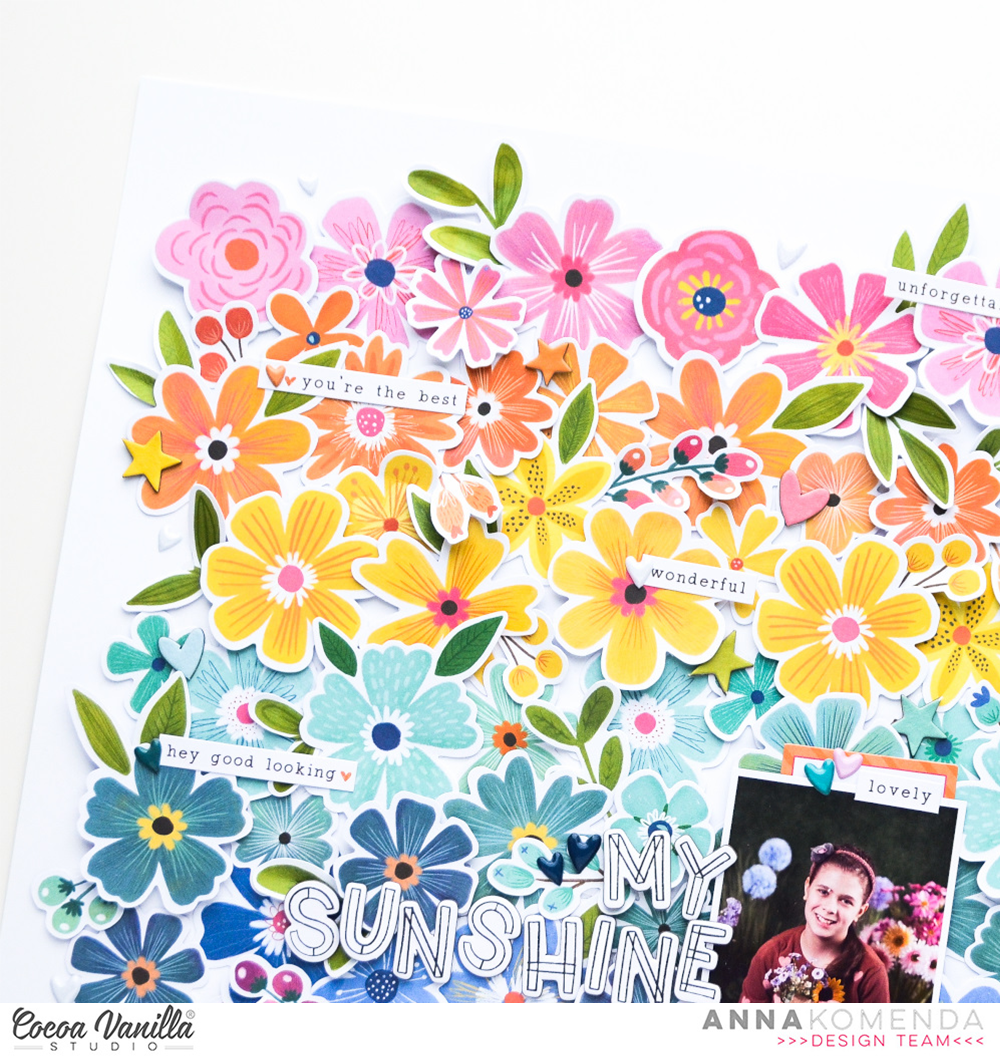
I found this challenge really exciting, so I dived into it using the beautiful “Storyteller” collection. I started by fussy cutting flowers from the patterned paper. I combined these flowers with the die-cut floral ephemera. Then, I trimmed some blue patterned paper to size and placed it behind the photo of my daughter. This photo was a perfect fit for the theme. She was posing by a small restaurant in Mexico, hidden behind a stunning sea of flowers.
Placing the photo roughly in the center of the white cardstock, I began creating a gigantic cluster of flowers above it. I was pleasantly surprised by how it turned out. On either side of the photo, I added a few small flowers and leaves in a playful manner. For the title, I used the word “Lovely” in black foam, and for the word “you,” I used a green alpha from my own stash. I thought the red puffy heart was a lovely finishing touch for the title.
Finally, I added some circle puffy stickers around the flower cluster. I had so much fun with the Cocoa Vanilla Studio May challenge, and I’m really pleased with how this floral layout turned out. I hope I’ve inspired you with this layout, and I’m looking forward to seeing your beautiful flower layouts too! Wishing you a creative and wonderful day.
Happy Weekend Crafty friends, it’s Michelle back with you today. I’ve used the GreatEscapeCollection for this layout to document our crazy little adventurer from a couple years back. Lets get into it..
As you can see I’ve gone fussy cutting mad again, this time with the Flags paper HappyCamper. I spent many nights in front of the TV cutting up that entire page of flags without any idea of how I was going to use them all. Then it hit me, let’s create another wreath / sunburst style type of layout.
I started with a blank piece of white cardstock with a roughly drawn large circle centred in the page and all the flags set out in colour groups ready to go. The easiest way I found to get a good mix of the colours around the circle was to work with each colour individually. Thankfully each flag design/colour had 3 of each so it was easy to place evenly in thirds around the whole thing. I used foam tape to adhere each flag to the background which gives it that little pop of dimension. I added more texture to the layout by sewing all the pieces down using my machine and a straight stitch.
Our Happy yet Crazy Little Adventurer – LOVED this little trike and its a little sad that she no longer fits to ride it around. The speeds she would get up to on this little thing, flying round and round my parents little court.
I ended up cutting the entire circular flag piece off the white background and then adhering it to the bright Horizon paper. I felt this made the wreath pop so much more. Next up I added the photo layered with a piece of A5paper, then adhered to the left of the wreath using some foam to lift it up.
I created the title using the puffyminialphabet from the Heart&HomeCollection along with the chipboard sticker word from the Chipboardstickers sheet. I layered in some stars and ephemera pieces to create a cluster of sorts to add even more fun to this already chaotic layout.
I added more of the larger stars around the layout to create more embellishment clusters, with a mix of tiny stars, puffy stickers and accessory word stickers scattered around to finish it all off.
I also added the usual splatters of gold ink to tie it all together and called it done.
Here’s one final look at the entire layout..
Well friends, thats all from me for today. Thanks so much for stopping by
Hey y’all! Laura Alberts back again and I’m dipping into an OLD collection from 2016! After organizing my craft space, I found this collection and just had to dive in! It’s such a stunning mix of pastels and gray tones that were perfect for these first snow pictures. The title ephemera is from Midnight, but the rest is all from Love Always.
I started with this beautiful mixed media-style background paper, a strip of teal, then used ephemera pieces to create a border in between. The Nuvo drops and ephemera hearts along the right side gave this layout a fun pop of interest that it needed.
I cut out two tags from the patterned paper and layered them behind my photos, then built up two clusters that run diagonally through the photos. The cluster on the top leans to the right and the one on the bottom leans to the left. This guides the eye through the layout, and added to the butterflies, creates a sense of movement on the page.
If you’d like to see how “Shine” came together, be sure to check out the process video below!
It’s Tarrah back with you and today I am sharing a new layout created using the awesome Great Escape collection! I can not get enough of this collection! I think this is my 6th layout using this awesome collection and I still have heaps of ideas flowing! Talk about value for money! I pulled out a super cute photo of my youngest son from when he was about 3 going for a ride in the car, I just love the thumbs up gesture- so cute!
I chose to work with a darker background paper choosing the ‘Journey’ patterned paper for this layout. I knew I was going to be adding the white cut file title and I really wanted that to pop off the page. The cut file I chose is from CUT to YOU, I cut out the title in white and cut out the road in black and backed it with some white cardstock to make it resemble a road as close as possible! For the large open letters in the cut file I took the A5 paper stack and choose various papers to add in the open holes. Once the cut file was all backed, I adhered the road down first using regular adhesive and then for the title, I added craft foam and then adhered it down in the centre of the page, I love adding craft foam so that it creates some dimension on my layout, this also allows me to tuck in bits and pieces where I want to if I feel some places need extra detail.
I added my photo on the right side, tucking it in behind the ‘D’ in Road I would normally layer a paper or a die-cut underneath my photo but this time I left it free of these. Once I was happy with the photo placement and the title it was time for my favourite part and that is embellishing! Below the photo I added a chipboard piece and I also added the flag chipboard piece overlapping the road and coming out of the ‘A’ in Road. The So Much Fun chipboardpiece I added on top of the cut file and also added some of the phrase stickers from the Accessory sticker sheet to help tell my story.
I took a few die-cuts from the ephemera pack and also added these around my page too, I love finding the perfect piece that is the perfect shape or perfect colour to fit in spots! One of the many things I love to do when I create! I like to balance my pages and describe my style is very clean but colourful too!
Some of the smaller embellishments like the puffy shapes were some of the last things I added to my page, along with stamping the date stamp which is one of my go to things on every page! Do you have something you like to include on every project? Kind of like a signature? Lastly I trimmed down the ‘Journey’ patterned paper to roughly 11′ x 11′ and matted the entire layout on white cardstock. I then machine-stitched a border using black thread around the entire edge of the layout.
Thanks so much for stopping by the Cocoa Vanilla blog today! I hope you are inspired to use your Great Escape collection and create some adventure layouts!
Hello everyone! I thought I would join in the May challenge fun by creating a layout using the Floral Frenzy theme. I have used Happy Days collection which I love so much.
I don’t do ‘busy’ layouts generally but I wanted my flowers to be the focus and went all in! I chose three papers to layer with the larger floral on the outer so I could layer my florals on it. I used Little Blossom, Lush Blooms and Flutterby papers.
I then took my floral ephemera and started layering under and over the Lush Blooms paper strip. I used foam tape of some of the florals to create dimension. I added enamel dots from my stash to some of the centres. Lastly I added some leaves from the floral ephemera
I used the reverse of the Flutterbuy to mat my 6×4 inch photo, I went with a black and white photo my daughter as there is so many colours and patterns in this layout, I didn’t want my photo to get ‘lost’.
I created three embellishment clusters around my photo using the die cut ephemera, adding the super cute cloud (which I added heart puffy stickers) , the bike and a phrase sentiment added over it with foam tape and another floral bunch, finished off with a butterfly and phrase sentiment from the Accessory Stickers.
Lastly I created my title using the chipboard titles and a super cute strawberry die cut to tie it all together.
And there you have it, one super girly layout! I look forward to seeing what you create with the floral frenzy challenge.
It’s Sophie with you today and I am thrilled to share my layout inspired by the May challenge!
The challenge this month is called “Flower Frenzy”: Using flowers as the main design element of a layout… The more the better…!
I used the Sunkissed collection for this colorful page and went with big floral clusters all around my black and white photo.
I drew a few flowers on three A5 patterned papers, cut them out and hand stitched on each petal. They served as a background for the flowers and leaves that are from the Sunkissed floral ephemera pack.It adds texture and depth to the clusters, and even though it’s very bold and colorful, it doesn’t compete with the black and white photo, that still stays the star of the page.
I teared a big chunk of the “Feelin’ Fine” paper and placed it on the upper part of the layout. I fussy cut a few clouds out of the “Just Chillin’” paper and used some Clear Stickers for my title.
Here are more close-ups:
It’s a very simple page with only beautiful florals as embellishments, and I love it!!
I hope you do too!!
You have the whole month of May to participate in this floral challenge. You can use any Cocoa Vanilla Studio collection, as they all have a huge amount of gorgeous flowers that can be used.
Welcome everyone. It’s Anna here with another page made with newest Cocoa Vanilla collection called “The great escape”. To be honest, I am more beach girl and trails, tents and campfires are not my first choice when it comes to spending free time. I do not have many photos from the wild to scrapbook with this line but it doesn’t stop me! Having fun has many shades. This time I picked two photos taken during one of the rides in theme park. Colors on them match “The great escape” perfectly.
For this page I created a little scene with a guidepost. I was inspired by one of the ephemera pieces to make one. I started with splashing white cardstock with light blue mist. Next step was to create a ground for my sighpost using two papers with green patterns: “Journey” and “Direction“.
Wooden pattern on the sighpost is from the older “No limits” collection. Yellow one is a piece of “Horizon” paper and orange one is “Happy camper” paper. Words on the sigh are made with alpha die and “Starry night” pattern. White “sky” felt very empty so I added few whimsical clouds hand cut from “Adventurer” paper.
It was time to add photos. I backed each of them with a piece of blue pattern paper from A5 Paper Stack. As usual, I embelished the area around the photos using bits and pieces from Ephemera Pack, elements cut out from “Wild life” paper and stickers from Accessory Stickers sheet.
As always I finished my pages adding tiny Puffy Stickers. They are my favourite final accent.
How do you like my idea for a simple, handmade scene? You can change things up by adding more words to the pole, changing theme from landscape to beach or a city. It’s a really versatile type of design.
That is all for today. Thank you so much for spending your time with mee and see you in May!