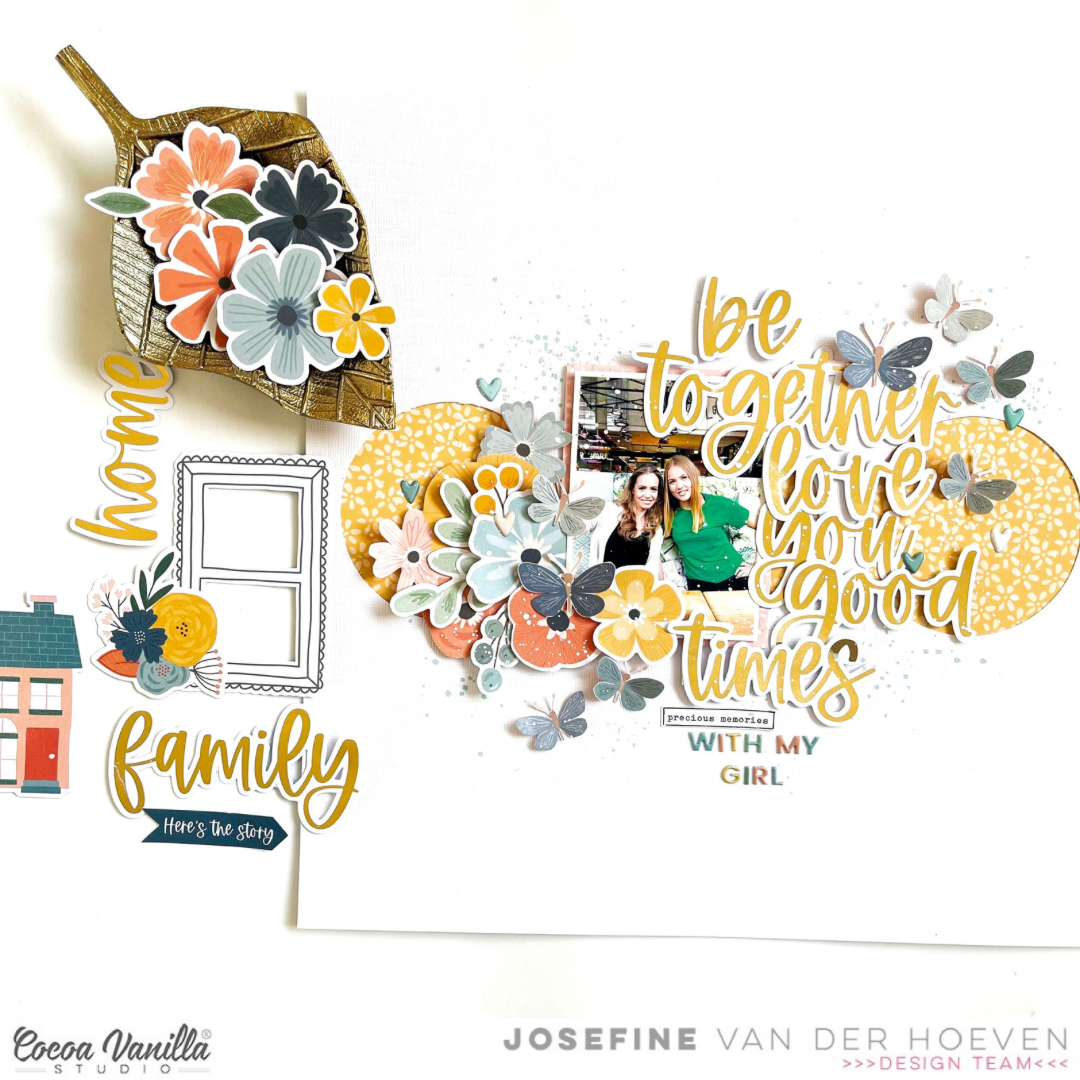
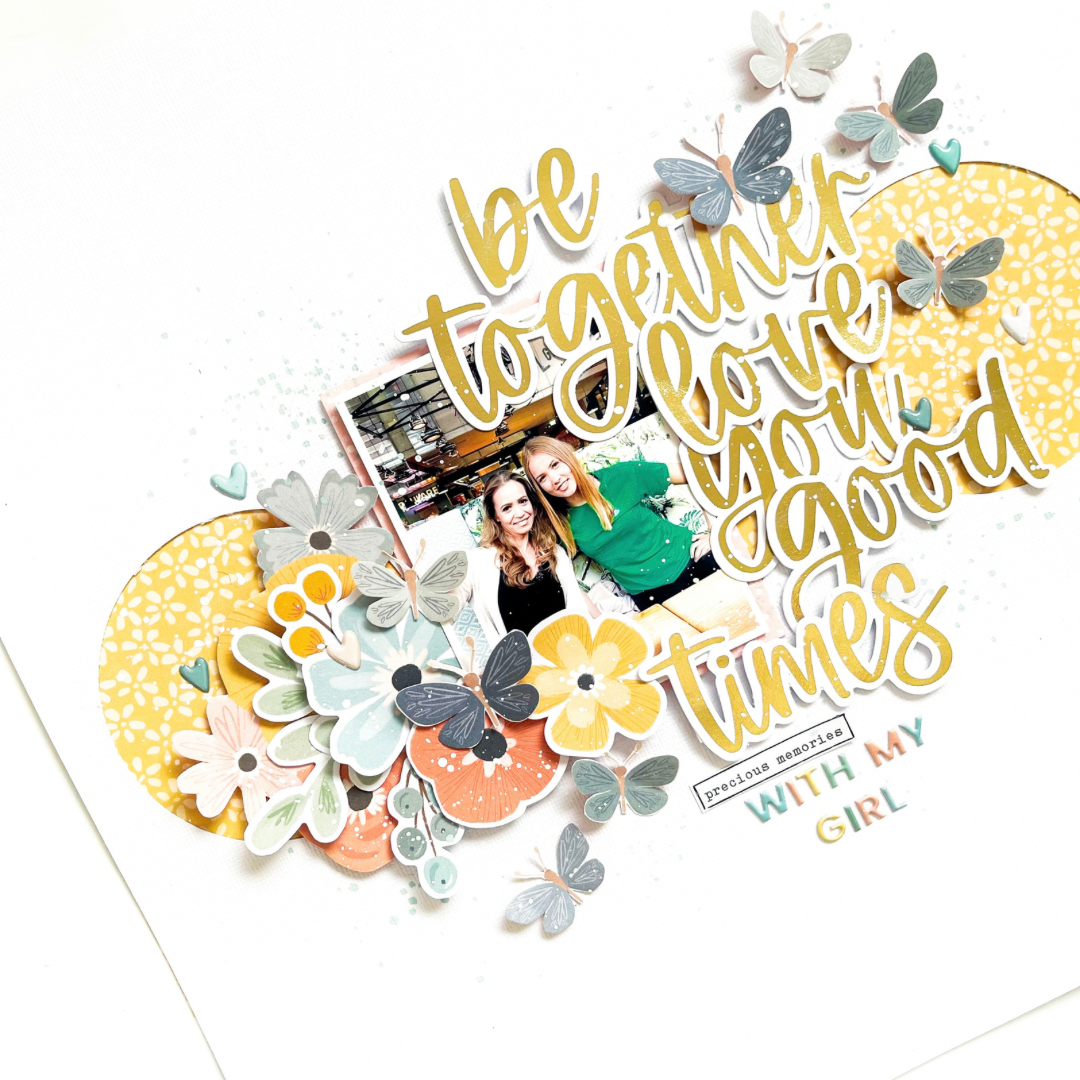
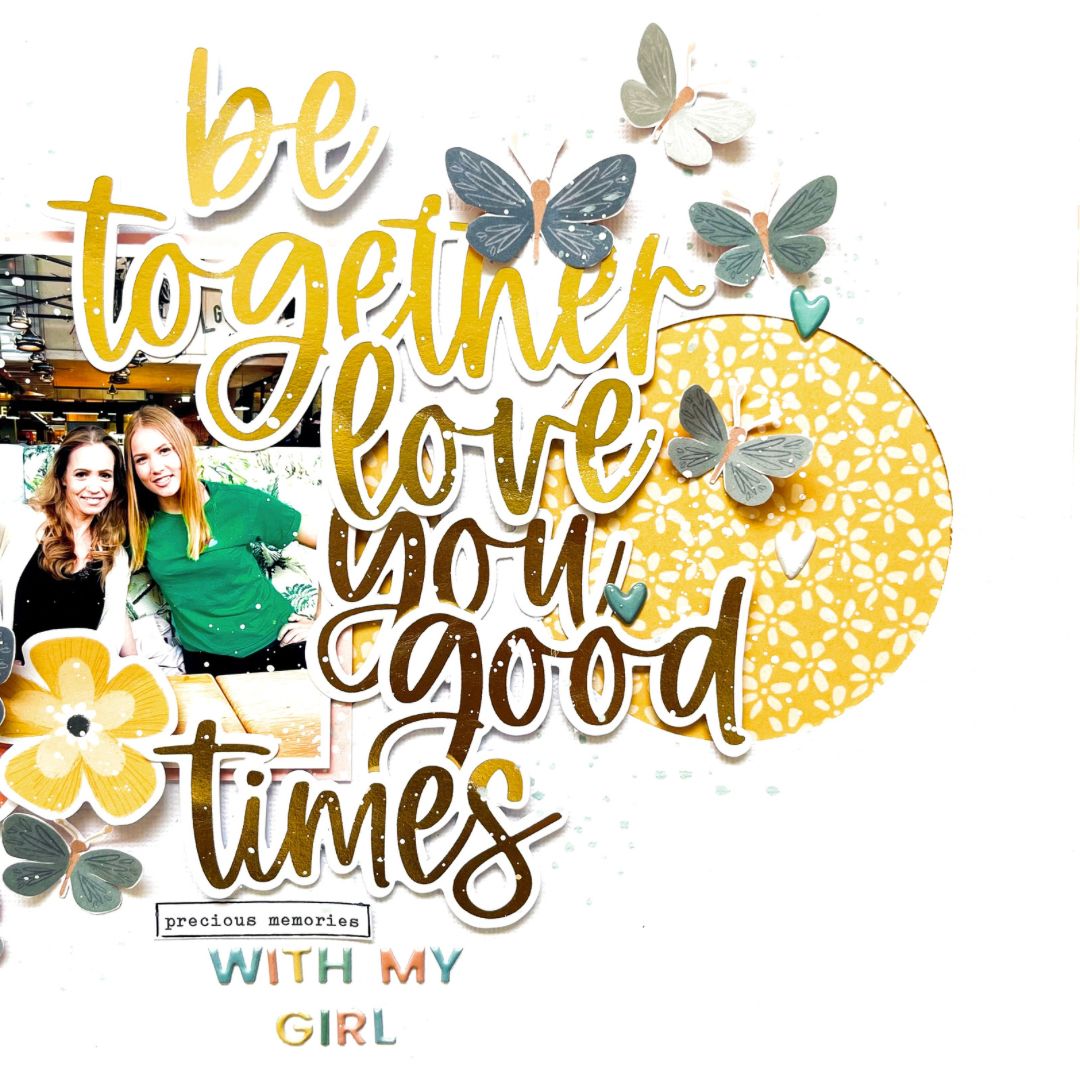
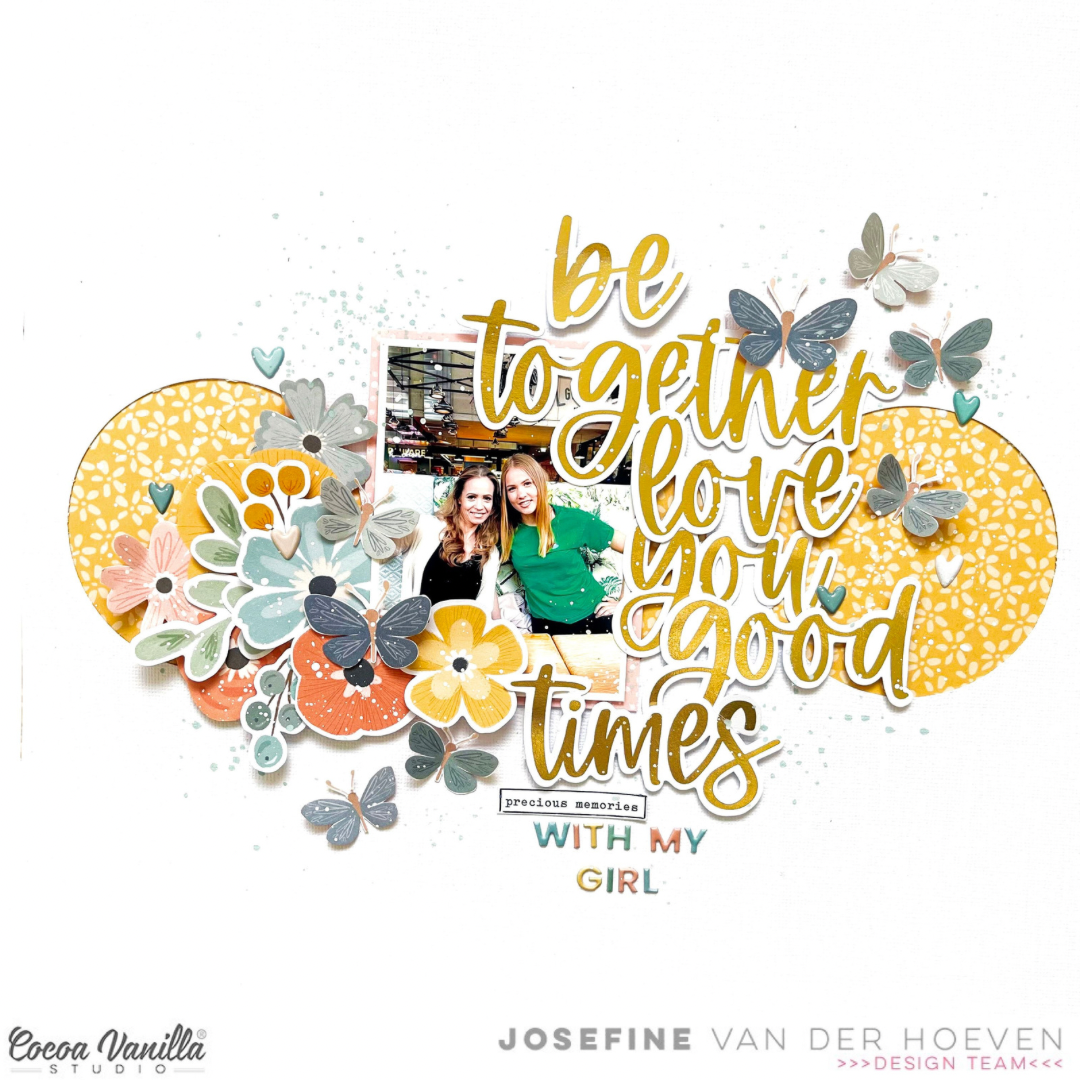
Welcome to today’s Cocoa Vanilla Blog! Once again, I’ve drawn inspiration from the beautiful Heart and Home collection by Cocoa Vanilla. This collection has delightful and fresh colors that inspired me. Today, I wanted to shine a spotlight on the gorgeous and elegant gold word die-cuts. By arranging the words in a stacked manner with a bit of overlap, I created a playful and eye-catching title.
To begin, I cut three circles from white cardstock and chose a vibrant yellow patterned paper to fill them in. The middle circle may be a bit elusive because I ultimately decided to place the lovely photo of my daughter and me in the center. On the left side, I crafted a cluster of flowers and butterflies. I choose die-cut flowers and some hand-cut blooms from the beautiful patterned paper, I added a touch of whimsy with strategically placed cut-out butterflies.
For the title, I incorporated the playful arrangement of gold word die-cuts, complementing it with a word strip and adorable puffy alphas. Additionally, I placed some puffy hearts throughout the layout. I love incorporating various elements and materials into my layouts to add depth and interest. To finish it off, I added distress splatters in the lovely Speckled Egg color. I find this shade to be a perfect match for the light blue-gray tones present in this collection.
Thank you for stopping by the blog today. I hope this layout has sparked some inspiration for you. Looking forward to seeing you next time with fresh ideas! Have fun, and until next time.
Hello Hello, Its Michelle back here today with a new layout share featuring our Beautiful Heart & Home Collection. For todays layout I thought I’d create something with our furry family members Daisy & Sonny, so a mixed pattern/colour combination it was.
I began by cutting into the magical A5 Paper stack that just keeps on giving to create squares in 2.5, 3 & 3.5 inch sizes to create a mixed “grid” effect on the background. I distressed the edges and adhered to the cardstock using foam for a little dimension and texture. As someone who doesn’t use much mixed media, I use other techniques to give layouts character as I just can’t handle the flatness without it.
I printed the photos of our sweet furry family members in colour and adhered them to some of the woodgrain pattern paper from the A5 paper stack. I added a little more texture by tearing along the bottom edge. These sweet little pups are so very loved in this house, but that sticker bottom right sums them up well. They’re both completely nuts lol
Before I added any of the embellishments I created the title using a word from the Gold Foil Title pack, handwriting and a mini cut apart piece from the A5 version of the Gather paper.
And then created a fussy cut florals cluster using the A5 version of the BOUNTIFUL paper. I layered the different pieces with my usual adhesives – double sided foam tape and tacky glue. I created mini clusters all over the page using similar elements in each as seen in the next couple of close ups…
Once I felt all the clusters were complete I added in tiny florals, mini puffy hearts, gold ink platters and dots
Here’s a final look at the whole layout
Well Scrappy friends, thats all from me today. Thanks so much for stopping by.
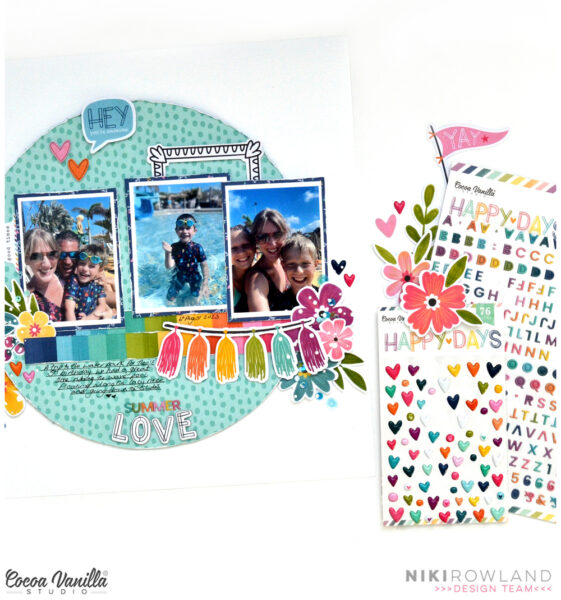
Hey everyone, this is Niki (@nikiclairecreates) and today I am missing summer so have gone back to using Happy Days! I’ve used photos from my little boy’s 5th birthday this year when we spent the day at a water park having lots of fun.
I started off with the turquoise paper which I cut into a large circle, and I added this to a white background. I mounted my three photos and added them to the circle together with two colourful stripes from A5 paper stack. I also added that gorgeous tassel ephemera from the Die Cut Ephemera.
I then added some floral clusters using a mixture of Floral Ephemera and fussy cut flowers. For my title I used one of the Chipboard Titles and the lovely Mini Puffy Alphabet Stickers. I added some puffy stickers and handwrote my journaling as well as adding some white paint splatters.
I hope you enjoyed this layout, it was fun to go back to summer time, I adore this bright happy collection so much!
It’s Tarrah back with you and today I am sharing a new scrapbook layout featuring the gorgeous Joyful collection.
I know, I know its still November but who said we couldn’t document Christmas all year round right? I know some people would not agree lol! I don’t know about you, but Christmas is one of my favourite times of the year to document memories, this photo is of our big Christmas tree from last year. I love this photo as it reminds me of beautiful times spent with my family.
I started by choosing the ‘B’ side of the Feeling Festive patterned paper to use for my background, I trimmed this piece down and adhered it to a plain white sheet of white cardstock and machine stitched a border around the outside to add some texture. I then cut out a cut file from CUT to YOU also using plain white cardstock. The A5 paper stack was then used, choosing several of the papers from it to back each letter in the cut file. Once the cut file was all backed, I adhered it slightly to the left on the ‘B’ side of the Feeling Festive paper. I cut strips out of the Holly Days paper and the Very Merry paper and adhered these vertically to the left of the cut file. I like how this helps to ground the cut file. Usually I adhere my cut files using craft foam however this time I knew I wanted to use craft foam on lots of the elements on top of the cut file.
I adhered my photo on the right of the cut file using craft foam and layered some of the Journaling Cards underneath, I then added some die-cut pieces from the Ephemera pack and some Accessory Stickers and Puffy Stickers here too. I like to add embellishments near my photo to help draw the eye to the photo. You can see in the image above the shadows that using the craft foam creates under the photo, I love how this looks! It also allows for lots of tucking of embellishments as well. Above my photo, I placed some of the word and phrase stickers from the Accessory Sticker sheet, I love how these help with journaling and telling the story.
To balance out the heavy right side where my photo is placed, I decided to add the gorgeous die-cut Christmas Tree from the ephemera pack to the left hand side using craft foam, I added one of the gold puffy stars to the top of the tree and also layered more of the word and phrase stickers from the Accessory Sticker sheet, on top of the tree. I added some more gifts under the tree using puffy shapes and die-cuts. In the centre, I placed the FaLaLaLa die-cut, a banner sticker and another phrase sticker. I also pulled out some of the chipboard and added some of the pretty gold stars and I also added the Santa Hat to the top of ‘D’ in the December cut file.
In the centre of the ‘D’ in the December cut file, I took one of the circle stickers from the Accessory Sticker sheetand added one of the gorgeous wood epoxy buttons to the centre of the circle. Once all the bigger elements were added to my page and I was happy with all of the placement, I took a look at my layout to see if I was happy with it and if I thought it was finished. I can very easily overdo it sometimes and never know when to stop but I added just a few smaller embellishments like more gold chipboardstars and some Accessory stickers to finish. I also stamped the date stamp which is what I do on all of my layouts, its one of my signatures that I always like to do!
Thank you so much for stopping by the Cocoa Vanilla blog today! I hope I have inspired you to pull out your Cocoa Vanilla Christmas collections and start creating some of your past Christmas memories!
It’s been a while since I have created with Happy Days collection and as I revisited the collection I knew I had to create a layout inspired by the strawberry paper Lush Blooms ,strawberry side!
This fabulous Cutie Pie cut file is from the Silhouette Design store. I didn’t want a stark white background so used the mixed media effect paper Juicy Fruit. To add another layer I cut some hearts and added randomly my page using Definitive paper, I think the dark blue makes a wonderful contrast against the more subtle colours of the layout.
I added my title letters with foam tape so I would be able to tuck elements under and over, it also creates dimension which when using a larger word title is important so your layout does not appear ‘flat’. I added a floral cluster which I tucked under the ‘C’ letter using the floral die cut ephemera. I added die cut ephemera strawberries over the letters.
To the opposite side I created another floral cluster, I added centres to the flowers using the round pieces of the puffy stickers. I added a die cut cloud to the top of my page, adding with foam tape so I could tuck a turquoise puffy heart behind it.
I chose a 3.5×3.5 inch photo which I matted on a paper from the A5 paper pad. I added this with foam tape, and finished of with a tab from the accessory sticker sheet which I added two puffy stickers and a phrase sentiment banner from the die cut pack.
I just love the dark pink/red strawberries and butterfly added on top of the title cut file, it just makes it ‘pop’. I added some finishing touches such as more puffy hearts, a word sentiment and layering the ‘I’ with paper cut hearts.
This layout definitely has a summer feel and this colour combo is a big yes for me. Also perfect colours to make a black and white photo stand out!
As always, thank you for stopping by and see you again in December, just over a month to Christmas!!!!
It’s Sophie on the blog today with a mood board inspired layout!
Have you seen the November challenge? Niki Rowland designed a gorgeous mood board named “Grateful” this month. Here it is:
I used the These Days collection for my page, and was inspired by the warm orange and yellow tones of the board, the beautiful flowers on the left lower image, the sewing on the top right image and the heartfelt love on the top left image.
The photo of my two fur babies on a crisp sunny morning is so precious and was the perfect photo to illustrate the theme of the board.
I centered it on a 12×12 white cardstock, added two strips of patterned paper on the top and bottom parts of the layout and handstitched two horizontal lines with green thread.
I selected two pocket cards, added stitches to them and placed them on each side of the photo for my subtitle and journaling.
My title comes from the Foam Title Stickers from the collection.
I added embellishments from the Ephemera pack, the floral die cuts pack, a few phrase stickers and two fussy cut butterflies.
Here are more close-ups:
A mood board is such a great source of inspiration! Check out the blog on November 1st to see all the details of the challenge and how to enter for you to get a chance to win a $25 store voucher to the Cocoa Vanilla Studio online store.
Hi Everyone, welcome back to the Cocoa Vanilla blog, it’s Kel here today to share a page using the Happy Days collection with you. I LOVE the bright colours of this collection, they make me so happy.
For todays layout I decided to pull out some watercolours and create my own background..here is my page…
I created a diamond type shape with the watercolour in a magenta colour found in the collection for the base of my photo and added some splatters in yellow.
For my photo I added some paper layers from the a5 paper stack as well as some black cardstock to help my photo pop. Next I created a cluster above my photo creating a tag, a frame from the Ephemera packand a sticker from the Accessory Sticker sheet.
I felt that the cluster needed something else so I cut a sun out from the ‘Feel Good’ paper and added some hand stitched rays..
Before sticking my photo down I added some quaze to add texture to the layout..
I pulled out the Chipboard Titles for my page title and placed them directly under my photo.. and added a rainbow from the Ephemera pack underneath..
My finishing touches was to add some stamping around the page, I love the black contrast with the watercolour..
I hope you have found some inspiration today and are using your Cocoa Vanilla collections up!
Hey y’all! Laura Alberts back again with a bold and beautiful layout that’s a bit of a stash dive into the stunning No Limits collection. I absolutely love this one and had to dig it out for this fun page featuring our visit to a hands-on museum on our last trip to Michigan. I started with a large block of this playful orange patterned paper with a little border strip on each side, then layered my photos over ephemera stars and a cut-apart journaling spot.
These large star frames are some of my favorite pieces from this collection! On the empty right and left edges of the layout, I added a scattered star border using fussy cut shapes from the Nebula patterned paper. Each of the stars is outlined with black gel pen to make them stand-out and I added a few tiny, sketchy stars for a bit of fun.
The bottom of the layout has a simple cluster with border strips underneath of a frame from the ephemera pack. I backed the frame with a cut-apart piece and filled it with the leftover bits of stars from the border layered under a cut-apart subtitle. This element was so much fun to put together!
I hope this layout inspires you to give this scattered border style a try. If you’d like to see how “Adventure” came together, check out the process video below:
Mandy here today for Throwback Thursday! I’m always a fan of using up my stash and giving an older collection a new lease on life, so I was excited to create a layout for the Throwback Thursday feature this month! I was in the mood to create a masculine page and wanted to document a photo of my son swimming in the pool on a recent family holiday. The No Limits collection was, as always, perfect for this! I’ve used this collection to document photos of my son when he was a toddler, right through to photos of my hubby, and everything in between. It’s so versatile, and I especially love the bright and vibrant colours!
I started by trimming the Eclipse patterned paper down to 10 inches square, and then adhering it to a sheet of white cardstock. This gave the layout a fun patchwork style look, and added lots of interest and colour to the background without much effort at all. I then chose a paper from the A5 paper Stack, and added some machine stitching around the edge before adhering it the middle of the page. This provided a matt for my photo, helping it to stand out and be separated from the background.
For my embellishing I decided to focus on the circular elements in the collection. I chose items from the accessory stickers, die cut ephemera, chipboard stickers and wood epoxy buttons, and arranged them from the bottom left hand corner of the layout, through to the top right. The diagonal flow of the embellishments helps to draw the viewers eye to the photo and title.
The repetition of the circular shape throughout helps to give the layout a cohesive feel, while the different textures, colours and sizes of each embellishment add interest to the page. I also added a sprinkling of chipboard stars to the page which provides another fun element.
For my title I wanted to use the Die Cut Titles, as I love the fun bold font! I decided on the phrase ‘You’re Cool’, which I think worked perfectly for this page! It not only describes my son’s ‘cool’ personality, but also references the fact that he ‘cooling’ off in the pool! I adhered my title with foam tape to help it to really pop off the page!
I hope that you enjoyed my ‘Throwback Thursday’ layout featuring the No Limits collection. What older Cocoa Vanilla collection do you still have in your stash that you’d love to dig into again?
Hello everyone! We all love pretty layouts and albums as they are a perfect way to preserve important moments and memories. But once in a while we also need a nice card to send or add to the gift and let’s be honest – there is nothing better than a handmade card! It can be curated specifically for the recipient to show them how much we care. That’s why, with every CVS collection, I like to make a bunch of cards too and have them ready whenever I need one. This is exactly what I did with new “Heart & Home” line.
I made three cards, each for s different occassion. My trick for a quick process was to use papers from A5 Paper Stack as a card bases. I simply folded each page in half and card base was ready! It has pattern on the front and back but inside is white, as papers in Papers Stack are single sided! Perfect solution! You can add extra pannel like me, or you can embellish your card directly on the base saving even more time.
Fot the first card I used Floral Ephemera Pack flowers and leaves. I used my scissors to trim the white outlines around flowers but you don’t have to do that! Simply arrange flowers and leaves on the card, add glue under each of the elements and your card is almost ready. My sentiment is made with Gold Foil Titles word “love” and Mini Puffy Alphabet word “you”. Few tiny Puffy Stickers hearts here and there and card was done!
Second card has a Polish inscription “Sto lat” which translates to “Happy birthday”. I made it inside the little wreath of flying moths. I cut them all out from “Fall beauty” 12*12 paper. I also added some machine stitching but it’s totally optional. Once again I finished my design with Puffy Stickers hearts and dots.
My last card is the quickest one as I utilised leaves leftoves I had from one of the previous projects. I die cut bunch of them from variety of papers from “Heart & Home” collection. Part was used for the layout, and the rest I added to my Ephemera Pack. I arranged few leaves in the center of the card, adding some foam squares under them for more dimension and finished everything with sentiment from said Ephemera Pack. It took me 10 minutes to complete. You can of course die cut your own leaves. It will take you a little bit longer to finish the card, but it’s only dozen you need.
And that is all for today! Do you like my quick and easy card ideas? You can use them for any other CVS collection too!
Thank you so much for spending your time with me and see you in two weeks!