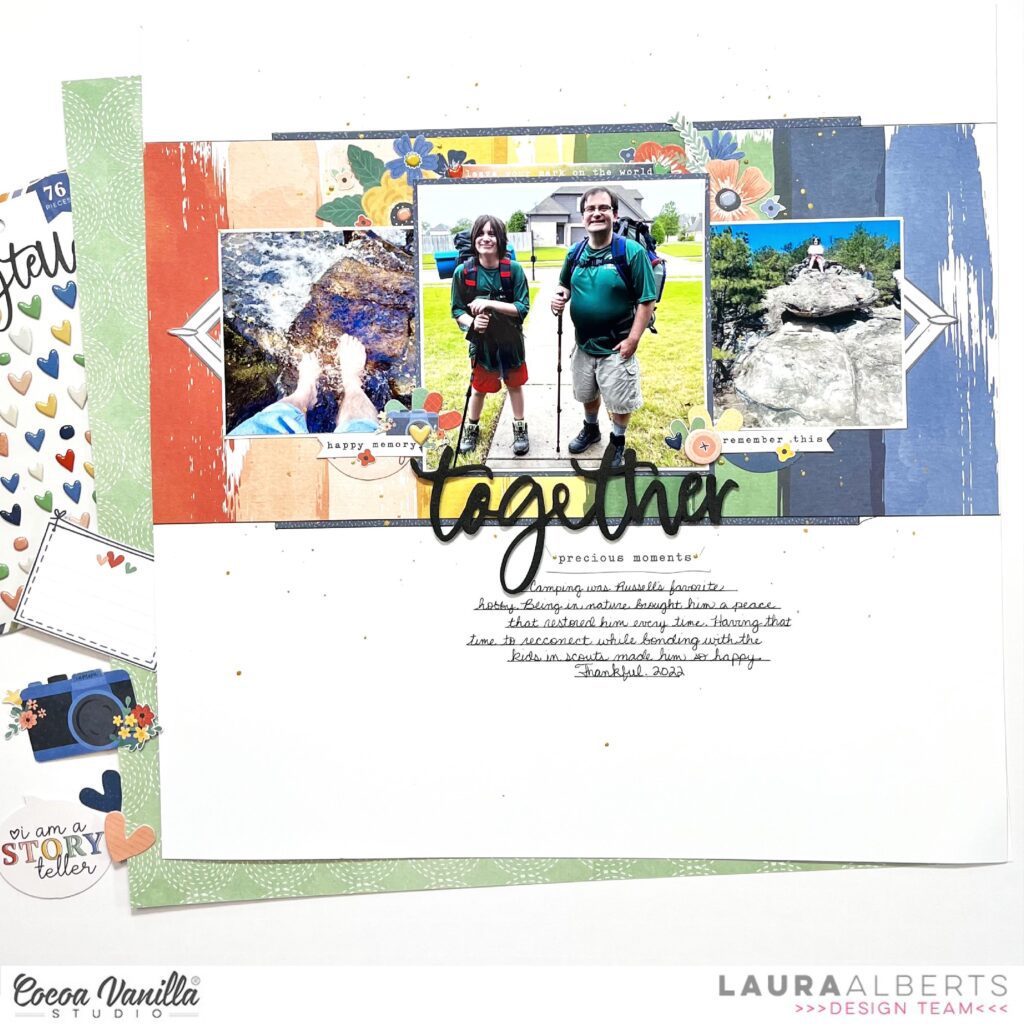
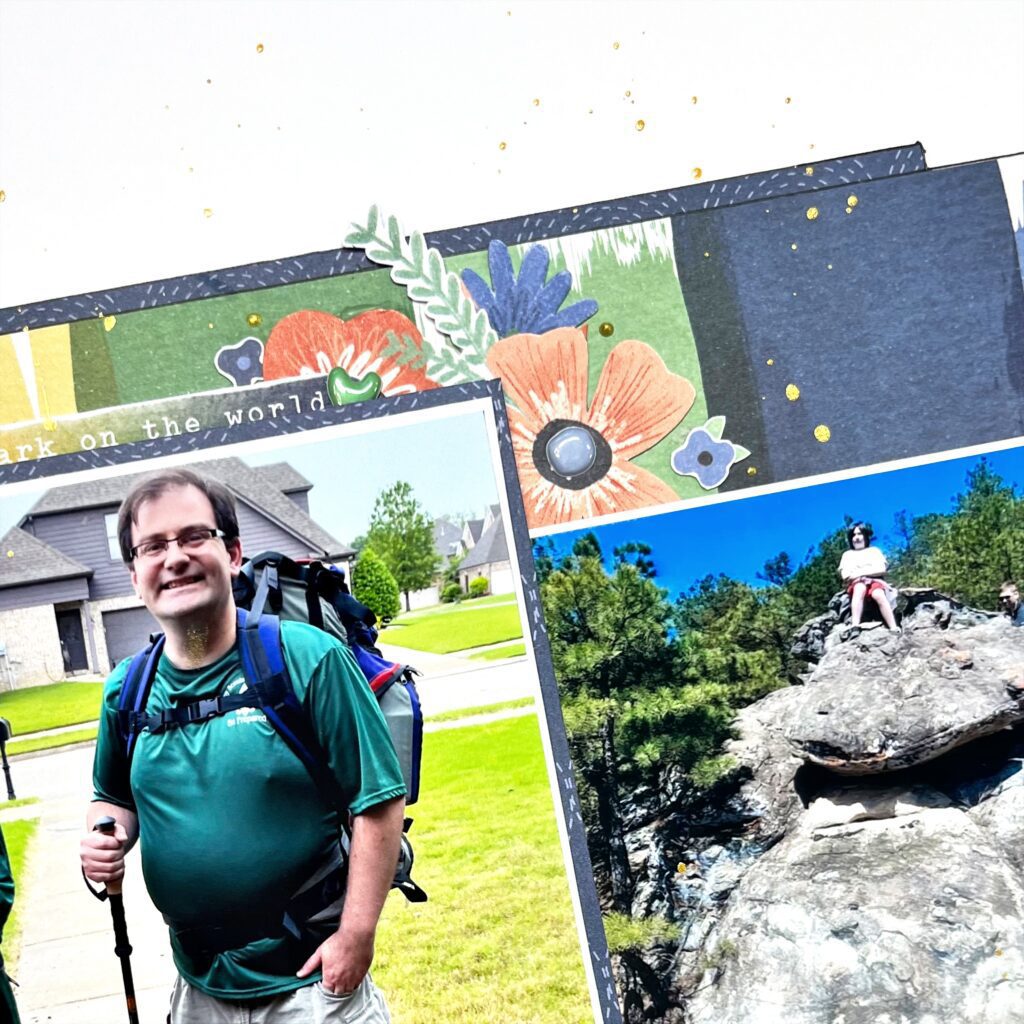
Hey y’all! Laura Alberts back again with a camping layout featuring the new Storyteller collection. This one is a horizontal design with three photos from an epic camping trip my husband and son took together. They hiked for 14 miles! That is definitely a story worth telling. For this layout, I primarily used the stunning Brighter Days patterned paper for this beautiful rainbow stripe in the background with navy paper from the A5 paper stack tucked behind it and layered around my center photo.
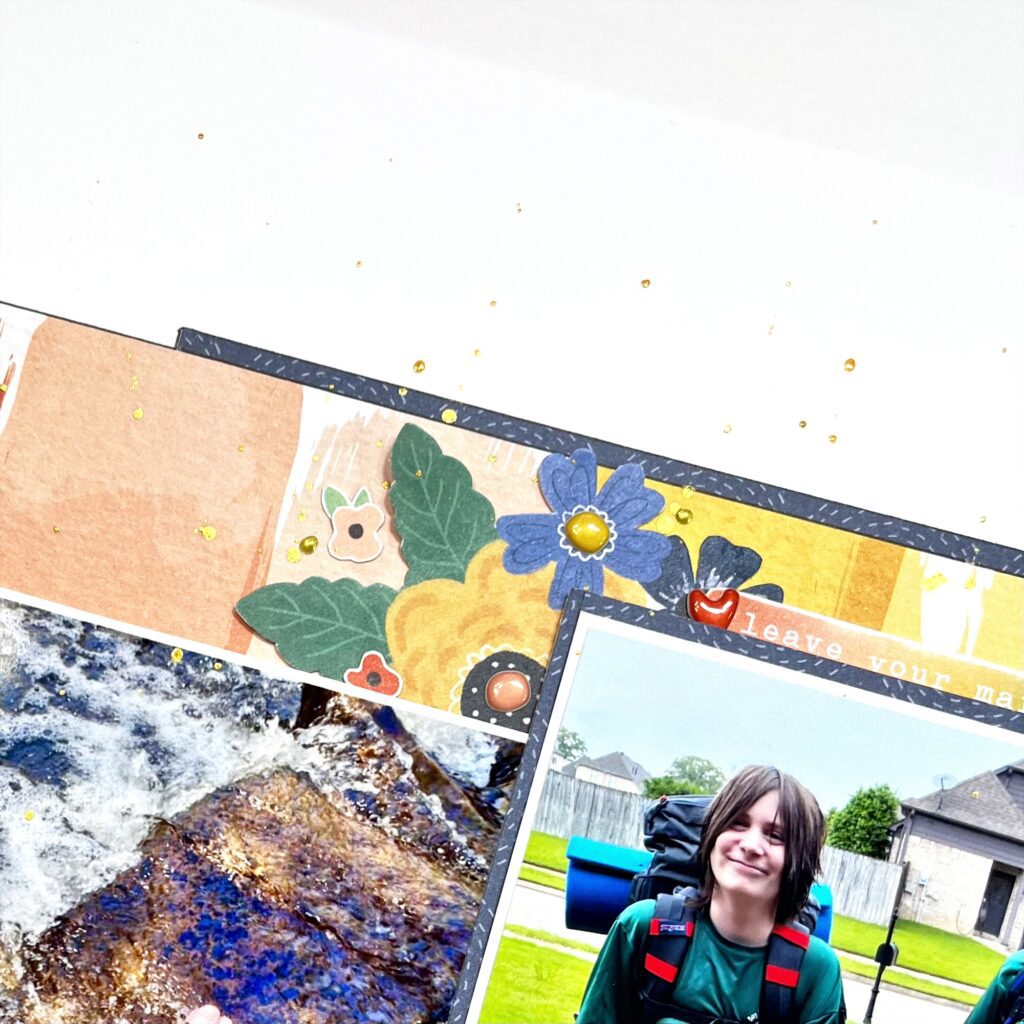
I created two clusters at the top and bottom of the largest photo. The top clusters are florals from the icon ephemera pack, with puffy stickers in the centers and fussy cut tiny florals added around the outside. I absolutely love the mix of floral types in this collection. With a variety of sizes and colors, this collection has such a beautiful mix of florals to choose from. I also added some outlining around my patterned papers to give the appearances of dimension, or shadows.
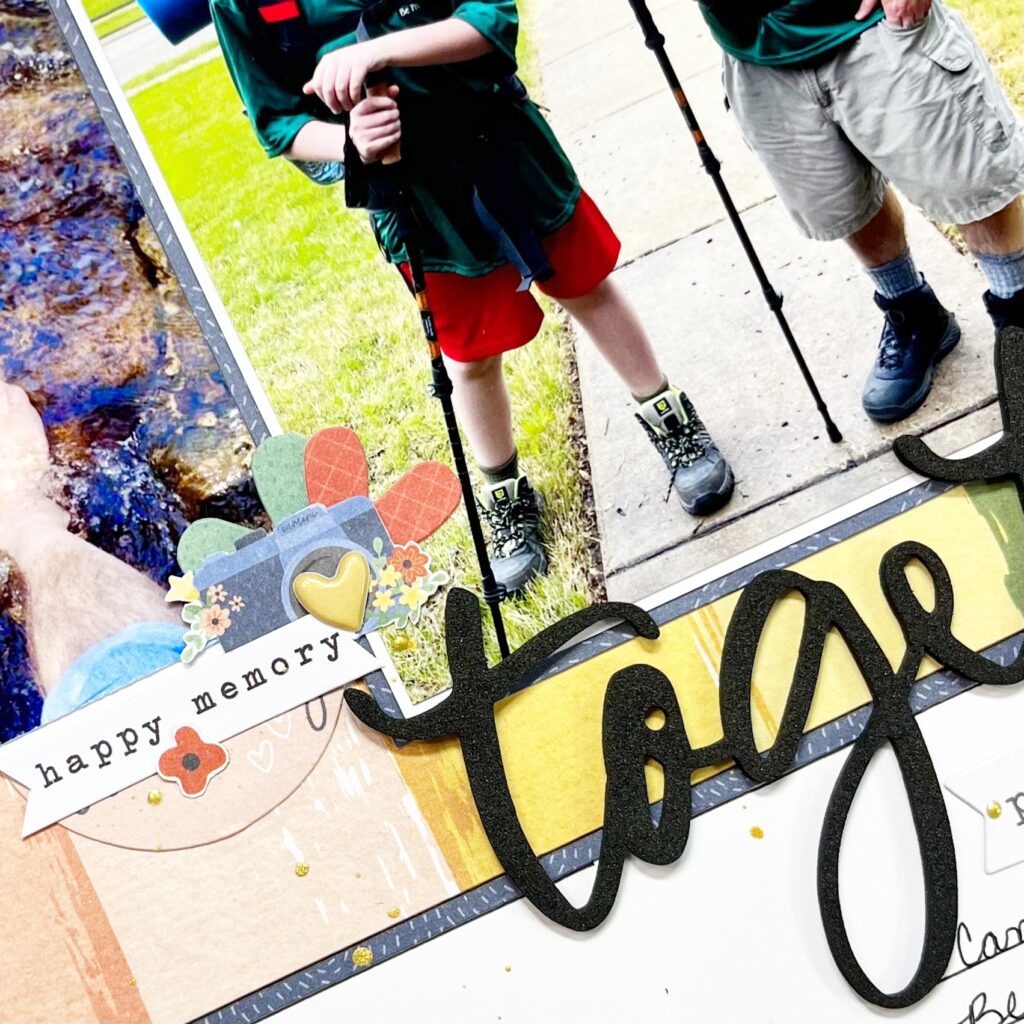
The lower two clusters are a mix of icon ephemera pieces and word phrases. Love the way these two clusters anchor the title on either side. I decided to keep the title very simple, using a foam word ‘Together’, and focus on the journaling instead. Using a T-square ruler, I drew several lines under my title and added in the important information I wanted to remember about my husband’s love for camping. This was such a fun way to document a memorable trip.
I hope this layout inspires you to add a bit of story telling to your layouts! To see how ‘Together’ was created, check out the process video below:
Mandy here today to share a new layout featuring the fabulous new Storytellercollection! I’m loving how versatile this collection is – it’s perfect for documenting so many different themed photos. For my layout today I chose to scrapbook a photo of my hubby and I. We recently booked a ‘Mystery Picnic’ date and had so much fun discovering new places and collecting lots of delicious food for our picnic along the way. I was keen to get this selfie that we took on the day scrapbooked, and the Storyteller collection was the perfect choice for this photo.
I started my layout off with the lovely blue Ditsy Daisy paper as my background. I then cut a circle, approximately 9 inches in diameter, out of a sheet of white cardstock. I then matted the circle with the woodgrain Cross it Off paper, added some machine stitching around the edge, and adhered it the centre of the page.
Next I matted my photo with three different papers from the A5 Paper Stack, adding some craft foam between the layers for extra dimension. I also tucked a Die Cut frame under the bottom right hand corner of the photo and added a little banner Sticker along the bottom edge of the photo.
For my title I decided on using the phrase ‘Our Story’ from the Foam Title Stickers. I love how this really pops! These stickers are so beautiful and versatile, and make it so easy to add a title to your layouts. Underneath the title I added a couple of little word stickers.
For my embellishing I couldn’t go past using some gorgeous fussy cut florals from the Spring Fling paper. I created a beautiful floral cluster on the bottom left hand corner of the photo, layering together various fussy cut flowers. Again I used some foam tape for added dimension when adhering some of the flowers.
I balanced this cluster out with another one on the top right hand corner of the photo, using more fussy cut florals from the Spring Fling paper. I then scattered a few die cut hearts around the floral clusters to finish the layout off.
Thanks so much for stopping by the blog today! I hope you enjoyed taking a closer look at my layout.
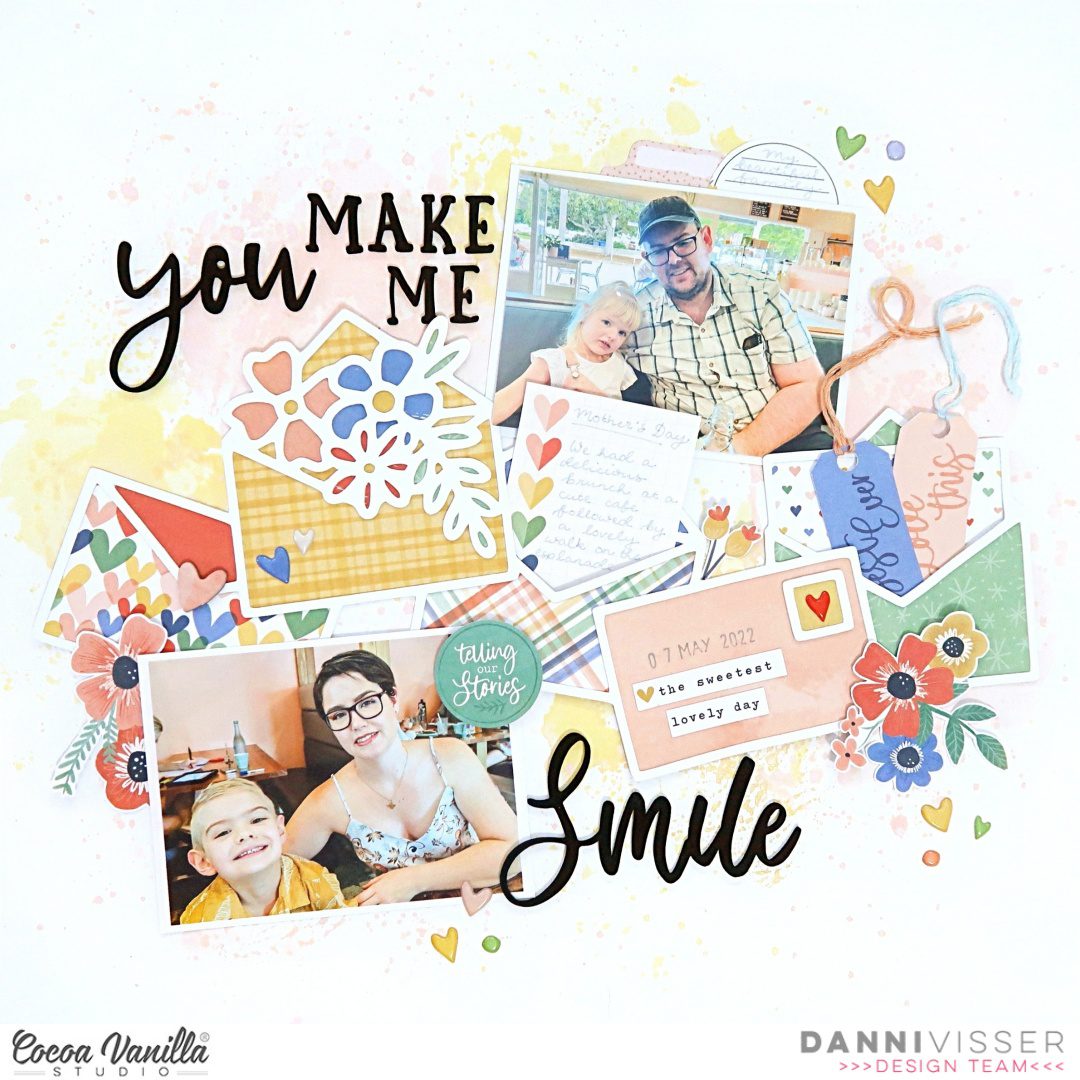
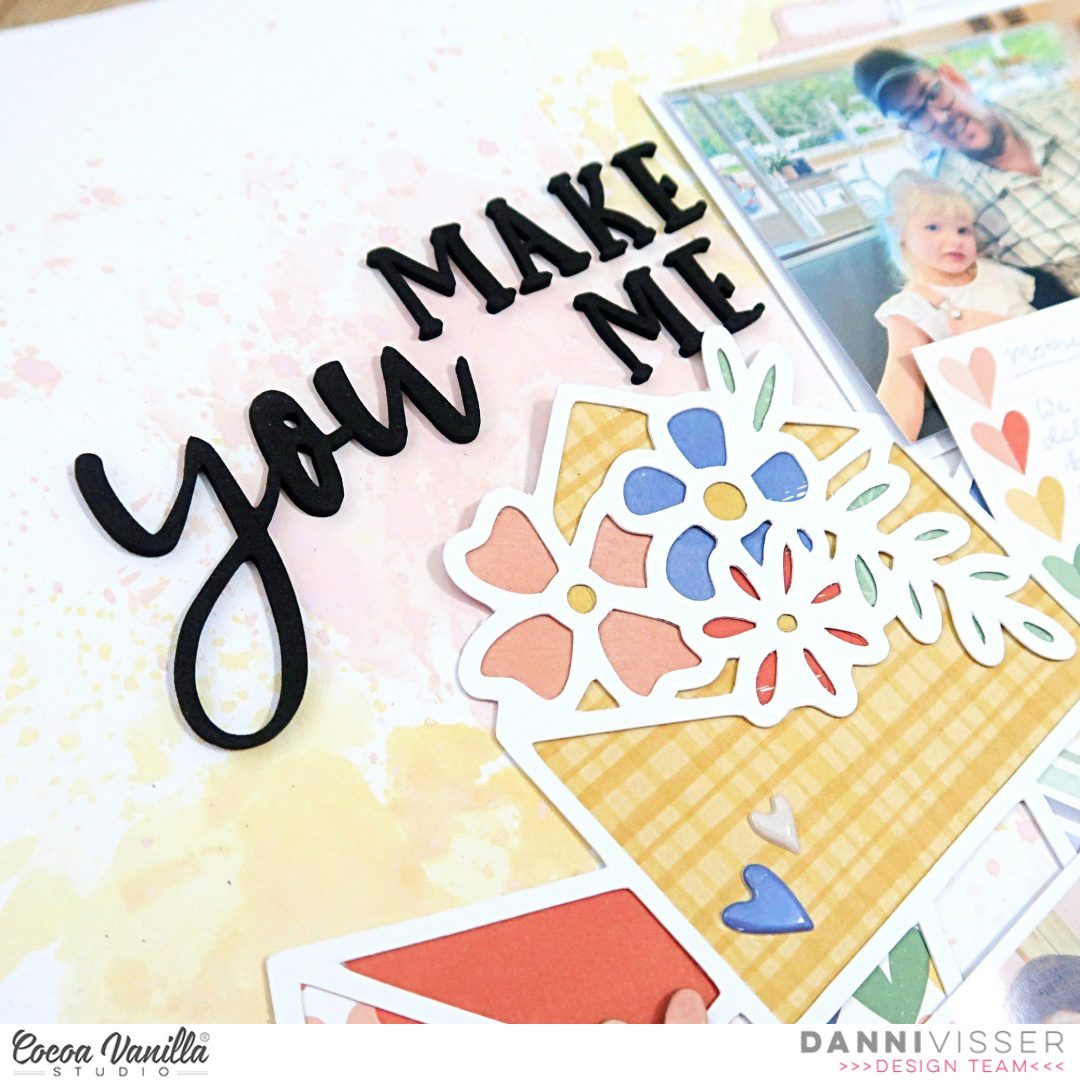
Hello lovely Cocoa Vanilla Studio fans! Danni here, back with another layout featuring the pretty Storyteller collection. On the blog this week the team are focusing on storytelling with our layouts. Today I am documenting what is a very important day of the year for many people, including myself – Mother’s Day.
I am not necessarily the most creative when it comes to storytelling; I am certainly not a prodigious journaller and I tend to go blank when it comes time to put pen to layout. To help overcome this I look for ways to add small areas of journalling in creative ways. This time I chose an envelope cutfile, knowing I would be able to tuck little pieces of my story inside them.
I went ahead and backed my cutfile using the A5 paper stack, alternating the busier patterns with the more solid ones to create variety. I made sure not to glue down the openings of the two envelopes I wanted to tuck things inside. To brighten up my white cardstock background, I took soft pink and yellow hybrid inks and added some subtle mixed media using the packaging technique.
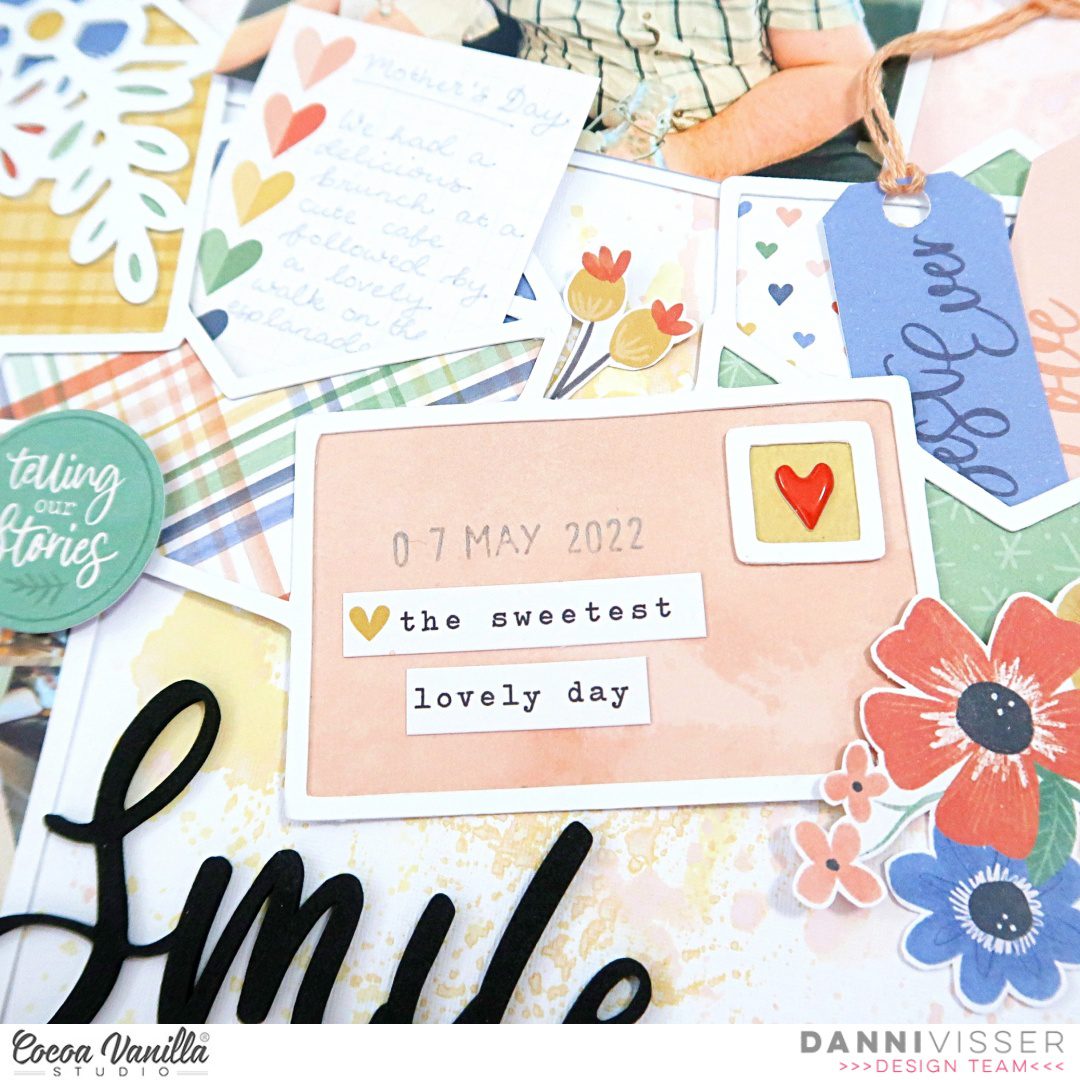
Next, I chose the cut-apart sheets from the A5 paper stack and cut out a journalling spot and a couple of the adorable tags. I added some journalling to the journalling spot and tucked it into the middle envelope of the cutfile. I hole-punched the tags and added some coloured thread to them before popping them into the other open envelope.
To add more detail to the little envelopes, I used the chipboard stickers to add a heart envelope seal, then added some tiny word accessory stickers and a stamped date to another envelope to make it look as if it had been addressed. I also popped a puffy sticker heart inside the stamp – so sweet!
I added my photos above and below my cutfile to frame it nicely, then added my title using the foam title stickers to fill in the remaining large, awkward spaces. I embellished by adding some die cut ephemera florals, some more accessory stickers and lots of puffy stickers sprinkled around the layout.
Finally, I added another small journaling spot above one of the photos to finish. I am really happy with how I told my story with this layout. I hope you enjoyed joining me too. Happy scrapping!
Hello Friends. It’s Anna here with my newest page made with new “Storyteller” collection. I am sure you are all already familiar with this extraordinary line and many of you already got your own stash of it. It’s such a versatile collection, with beautiful color palette that will match any photo. In August we are all focusing on telling stories with our projects. I love making layouts but I usually hide my journaling on the back of the page. I am totally not happy with my hand writting so it’s the best solution for me. Today I am documenting the story of one of the toys my younger daughter got when she was just a baby. It was one of those bouncers with activity toys around the baby, all very colorful and making noises. It was a hit for us – I could take a quick shower knowing Maja will play with all the buttons and creatures. She loved bouncing up and down and she often fell asleep while playing there. She was hopping like crazy and my older daughter, who was five at the time, named this toy “hopek” from hopping (no English word not that correspond to that made up phrase). So the bouncer got it’s own unique name, that made us laugh every time we were using it. Gabrysia was famous for making up new words for many things.
I started my page with white cardstock. I knew I wanted to make something colorful as the bouncer was colorful as well. Plus I was scrapbooking cute baby photo and those scream for playful color combo! I took my inspiration from paper called “Brighter days” (You know I have a thing for rainbows). I used small heart dies and cut out set of four hearts from each color strip. My photo is almost A4 in size, so there was not much space left in the background to play with. I reached for long forgotten Gelatos and scribbles with them using colorful strips as a guide. I smeared them with my fingers a little bit. It created very playful designs, that looks like it was made by little child.
Next step was to glue down the photo with a little frame made with “Oh my heart” paper. I just wanted to make the picture pop from the white background. I reached for Flower Ephemera pack and picked flowers in corresponding to the strips colors placing them on the bottom edge of the photo. I also added my hearts using pieces of sticky foam to add a bit of dimension.
I also added some flowers on top of the photo making sort of a frame around the cute baby face. Bits and pieces from Ephemera pack landed on the photo as well. I used colorful banner, camera with flowers and a tab. Few chipboard butterflies enriched my composition around the flowers.
Last step was to add few puffy hearts (I just love those puffy stickers!) and three wooden epoxy buttons. I tend to hoard them as they are the cutest embellishment ever and I am always afraid I will run out of them.
I love how simple, playful and colorful this page turned out. It’s an essence of my scrappy style and it has rainbow! Rainbows always make me so happy. That is all for today. Thank you so much for stopping by. I hope you feel inspired by my design.
Hi everyone, Its Melissa here and I’m back today to share a layout that I created with the beautiful Storyteller collection for our current Tell a Story theme! If you’ve followed my work for a while you’ll know that the story behind the photo is just as important to me as the photo! So for this layout I carefully selected a photo that had a big story I wanted to tell. The photo is of Ava at her first Pediatrician’s appointment when we first moved a year ago.
I had a lot to write for my journaling on this layout. So I went into my stash to find lined paper to ensure that I wrote straight! My background paper is Spring Fling and if you watch my video below you’ll see that this isn’t the paper I started with. I added white acrylic paint splatters to make it more painterly.
I added some distress oxide ink using the packaging technique to provide some distress and interest onto the lined paper. I love how it looks against the mixed media look of the blue background paper.
I backed my sweet photo of Ava with three papers from the A5 Paper Stack. I distressed all of the edges and went with an lining them up unevenly. I embellished with a cute banner from the Die Cut Ephemera, and I created my title with two of the Chipboard Stickers.
Other embellishments I used are Chipboard Stickers, Accessory Stickers and Wood Buttons. I added twine from my stash and machine stitching helped adhere the lined paper and added texture.
I adore the sweet camera ephemera pieces, and was thrilled to get on onto this layout.
Hey Hey Scrappy friends! It’s Michelle here today with a new layout share featuring the beautiful Storyteller collection, documenting a sweet little furry face and a peek at the human child. I dipped into my stash of CUT to YOU cutfiles and went with a rainbow theme to bring this all together.
Leila always greets Daisy with the saying “Sweet Puppy Face” and I would absolutely agree, especially when she’s looking as scruffy as she does right now. I snapped this sweet pic of the two of them a few hours before creating the layout, when we were all snuggling on the couch after breakfast.
It’s been a little while since I shared something using a cutfile so I thought I’d go big with this one. Theres even a splattering of inks in multiple colours to compliment the heart, which may or may not have taken me multiple tries to get it right after a few failed attempts at a more messier background.
Let’s walk through how it all came together, starting with the cutfile. I chose the Sunburst Heart file from the CUT to YOU store and resized it in silhouette studio to fill up a large portion of the cardstock background. Once cut out, I backed all the individual ‘bursts’ of the heart with a rainbow assortment of patterns from both the 12×12 and A5 paper stack, then added machine stitching for extra detail.
I drew a rough outline of where the heart would sit on the layout and splattered the inks around in the same order that the papers are on the cutfile, then once dry I adhered the heart over the top using foam and double sided tape to pop it off the page.
I added the photo to a piece of the woodgrain paper (Cross it Off) and adhered to the right of the heart, then using the Foam title stickers and some older alpha stickers created the title to the left of the photo.
I created 3 floral clusters within a ‘visual triangle’ to embellish the layout and draw the eyes attention around the page. The clusters are made up of both fussy cut (Spring Fling) and ephemera florals, puffy stickers and a couple of word stickers from the accessory sheet.
I kept some of the threads loose for added texture, and used a range of different adhesives within the clusters for different depths of dimension
I ended up cutting the white cardstock down and matting the entire layout on to the Ditsy Daisy paper then added more machine stitching into 2 opposite corners.
Here’s a final look at the entire layout
Really loving this collection , and am very quickly using up so much of the pretty papers. I’ve got a mini book in the works that I hope to share soon thats used up a tonne of this collection, can’t wait for you to see it!
Well Scrappy friends thats all from me for now, thanks so much for stopping by.
Howdy friends! It’s Kylie back with you all again for a new month and a new project! My assignment for this week was to ‘tell a story’ within my project. As Scrapbookers, I think we always ‘tell’ or ‘preserve’ a story in the pages we create. But I wanted to share with you all a few extra tips of how to spell out a complete novel on your pages. For todays design I have used the sublime ‘Storyteller’ collection.
To really tell a story on a layout I believe you need more than one photo. A ‘series’ of photos will showcase an event or happy memory you wish to preserve. The first thing you will notice with my page is that I have used a true grid design for my layout. By doing so I was able to add 6 different photos from a fun day at the Strawberry Farm. Now I know it looks like I have a major in Geometry to get everything SO square and neat but the truth is I cheated! I have used a fabulous 16 square grid cut file designed by Gwen at Cut To You.
First I resized my cut file to around 9.5″ x 9.5″ and cut from white cardstock. This was sat aside whilst I prepared my background or ‘border’ pages. I cut a 10″ x 10″ piece of ‘SPRING FLING’ paper and adhered it centred over the ‘DITSY DAISY’ paper. I saved the inside squares from my cut file mat to use as templates for my photos and cardstock to fill each square. It was very simple, I held a template over cardstock and with my scissors I cut a square just slightly larger than the template. These were then added to my grid.
‘But how did you print your photos so small?’ I hear you ask?? I have two methods I use to do this. It can be done by resizing all of the images onto one page using my Silhouette software and then printing on an A4 sheet of photo paper. However for these photos I resized them on an **app called ‘Moldiv’ which then allows me to just print them out on my printer. (**I am in no way affiliated with Moldiv, this is just a recommendation.) Once they were printed I used the exact same method as I did with my cardstock to cut them out.
Another great way to tell a story is to write one! I have added some journal strips which I typed on sticker paper and cut out. They are never the same width and are often crooked but I always love that rustic appearance. It gives a fun sense of ”homemade”. With my photos and cardstock squares in place it was fun to start embellishing. I added a cute title with the ‘FOAM TITLE STICKERS’ and used quite a few of the CHIPBOARD STICKERS which added a nice dimension.
One of the many things I love about Cocoa Vanilla is the very generous FLORAL EPHEMERA packs. Florals are my jam and there are always oodles to play with. I layered several together and combined them with the WOODEN EPOXY FLAIRS also.
Thanks so much for stopping by the blog today. I hope you find my few tips useful with your own creating! Have fun!
It’s Tarrah back with you and today I am sharing another new scrapbook layout featuring the stunning Storyteller collection!
I have had this lovely photo of my parents printed for ages, I was finally able to document it using the Storyteller collection because look how the colours in the photo match perfectly with the colours in the collection?!
I chose the gorgeous woodgrain side of the Cross It Off paper as my main background paper, trimming this down and adhering it to a plain sheet of white cardstock. I decided to cut out a gorgeous book cut file from CUT to YOU from white cardstock using my Silhouette Cameo machine. I chose a variety of the papers from the A5 paper stack and backed them behind the cut file. Once the cut file was backed, I added some craft foam to the underneath and adhered it down on the woodgrain background paper. The reason I do this is so it creates dimension, shadows and texture. Once it was adhered to the background, I bent the edges of the ‘pages’ to make it look a little more realistic and to add even more dimension.
I adhered the photo to the right side of the cut file and tucked in one the pocket cards on the left side of the photo. Under the bottom left corner I took one of the accessory stickers and placed it down. Further left of the pocket card, I took one of the banner chipboard pieces and adhered this down. Around my photo I added a few different embellishments including at the bottom of the photo, I added the ‘Love This’ ephemera piece using craft foam and tucked the half circle Our Story ephemera piece below it. To the right of the photo I added one of the super cute wood epoxy buttons and a small heart die-cut between the photo and the pocket card. Above the photo and below the chipboard banner I added some phrase stickers from the accessory sticker sheet to help tell the story.
The title for my layout is ‘Our Story’ made up from the gorgeous black foam title stickers. I placed this at the bottom of the cut file and love how it looks there. I also placed the swirl and a heart from the same pack here too. As I had the black at the bottom of the page, I wanted to create a visual triangle and did this by adding 2 more hearts in 2 different places on my layout to draw your eye around the page. Creating a visual triangle is important when designing and for the finished result as it becomes pleasing to the viewer. With my layout all of the colour going on in it, the visual triangle with the solid black elements helps to break up some of the colour. Under the title, I took more of the phrase stickers from the accessory sticker sheet and placed them down.
At the top of the book cut file, I knew I wanted to tuck in quite a few of the stunning florals from the floral ephemera pack. I played around with a few of them for a little while until I as happy with how it looked, I bent the edges of the petals and leaves also. In either corner of the book cut file, I took 2 of the floral chipboard pieces and tucked these in how I liked them. After the florals were added to the top, I felt like the very bottom of the page was a little bare so I took the floral book chipboard and placed it in the centre at the bottom of the page. I love how that added a little something to the page. I also placed a phrase sticker from the accessory sticker sheet on top of it. Lastly I stapled the ‘Love This’ tab on the right of the cut file and stamped the date stamp below the title.
Thank you so much for stopping by the Cocoa Vanilla blog today! I hope you enjoyed seeing and reading about how I created my layout as much as I enjoyed creating it?!
Haven’t got yourself the beautiful new Storyteller collection yet? Make sure you keep an eye out in the Cocoa Vanilla online store for its arrival soon!
Hi everyone, it’s Sue Plumb here to share my latest design team project with you. This month we are focusing on the reason we all scrapbook, and that is telling stories. For today’s layout I decided to document the story of my son and his friend. These two have known each other since they were babies, and it is so lovely to see that their friendship has lasted. I decided to use the gorgeous Storyteller collection for my page, and kept my photo black and white so that it wouldn’t clash with any of the colours of the collection.
I began my layout by creating a mixed media background, using a combination of pale peach acrylic paint and ‘Prize Ribbon’ Distress Oxide ink. I applied the acrylic paint with a brayer over an area approximately half of my page, leaving a white border around the edge. I really love the effect the brayer creates, and it also helps the paint to dry fast because the coat is so thin. On the other half of the page I applied the Distress Oxide by mixing it with water and using a wide brush, before setting it aside to dry. I love the contrast using two different mediums give the page – both from the colours and the effect of the different techniques.
Whilst my background was drying, I turned my attention to the paper component of my page. I cut a piece of the vibrant Oh My Heart paper to sit horizontally across my page where the paint and ink met. This provided separation between the lighter colour at the top and the darker colour at the bottom. I also added a very thin strip of the green pattern on the the reverse of the Fly Away paper behind where I planned to sit my photo. My photo was matted with a blue paper from the A5 Paper Stack, and I also tucked in a small yellow doily and some frayed gauze underneath it. In the top right corner of my photo I added the so happy banner sticker from the Accessory Sticker sheet.
Alongside my photo, I added one of the Pocket Cards which featured a coordinating strip of coloured hearts, and I used my typewriter to add my journalling to it. I then topped the card with the the story behind the photo die cut from the Die Cut Ephemera pack, which was mounted on some foam tape to help it stand out. Along the bottom edge of the card I added another die cut, this time a small banner which read happy little moments, that was also mounted on some foam tape. A Wood Epoxy Button with a sweet little camera completed my cluster on that side of the page.
Near the top edge of the page along the border of my paint, I added a second strip of the Oh My Heart paper, which I used as the anchor for another embellishment cluster. This one featured two die cuts – a camera and a floral piece, which were both adhered using foam tape. I also added another Wood Epoxy Button, this time the smaller size, over the lens of the camera. Alongside that was the noteworthy banner piece from the Chipboard Stickers sheet.
Below my photo I added yet another piece from the ephemera pack – a beautiful strip of bunting which provided a lovely underscore for my photo. This was also popped up on foam tape to ensure it sat up at the same height as my photo.
At the bottom of the page I added the words So Sweet from the Foam Title Stickers pack to form my page title, and a small foam heart from the same pack nearby. I finished embellishing my page by adding three butterflies from the ephemera pack and then last of all I added some small black ink splatters to tie it all together.
I am so happy I documented this story of friendship for my son and I know this layout will mean so much more to him with my words included on it than if it was just another pretty page. I know we can all be guilty of not including enough journalling on our layouts from time to time, so hope you are feeling inspired to get a story told on your next page.
If you’d like to see exactly how this page came together you can watch my process video:
It’s Sophie on the blog today and I am happy to share a brand-new page created with the Storyteller collection.
I used two cut files for this layout. They are designed by Paige Evans.
I used a thick white cardstock for my background. I backed a few of the clouds with a blue patterned paper from the A5 Paper Stack. I added a little bit of white gesso on some areas to create a more faded and fluffier look.
I placed the clouds on the upper part of the page, mounted on foam adhesive.
I backed the little houses cut file with many different patterned papers, again from the A5 Paper Stack and added a few white scalloped borders created with a border punch.
I also created a shaker heart on the middle bigger house and used some coral sequins from my stash.
I used a colored photo of my daughter Sabrina watering the garden with the “help” of our two dogs…
My title comes from the Foam Title Stickers pack.
I wrote down my journaling on a fussy cut piece of patterned paper and embellished around the shaker heart, journaling and photo with bits and pieces from the Die Cut Ephemera pack. I scattered a few Puffy Sticker Hearts as the finishing touch.
Here are more close-ups:
I love to use cut files on my pages. Do you use them often?
Well, thank you for passing by, and I will see you again soon!